Bike Position: How to improve your neck, shoulders, wrists and body position on your bike
 Are you wanting to improve your bike position? Common problem areas for cyclists are the head & neck, shoulders, wrists and body positioning. In this article, I’ll take a look at these areas and how to improve your position and prevent injuries.
Spring has definitely arrived, bringing with it the best time of year to get out and about on your bicycle! Whilst those hardy commuters throughout winter have braved the Canberra chill, the rest of us now have a great chance to go mountain biking or road cycling once again. The outline of this particular topic revolves around the oft-forgotten art of upper body positioning; involving your neck, shoulders, arms and wrists.
Don’t forget to have a read of Sophie’s article on 5 Core Strength Exercises for Cyclists. Our resident core specialist, Sophie, has produced an excellent article regarding the importance of abdominals and back muscles when riding.
An amazing statistic I found whilst researching for this topic was that 57% of participants in this particular survey indicated that they had never done anything to reduce any discomfort whilst cycling. Whether you have purchased your bike new or off Gumtree, I find this astounding. It is highly unlikely that the bike will fit your body type perfectly, straight out of the crate. You will also not be exactly the same build as the seller.

1. Bike position for your head and neck
The position of the head and neck is crucial in a bicycle setup. This can vary a lot depending on what type of bike you are riding. A city biker involves a higher position on the bike to scan for traffic. A mountain biker requires a steeper angle to look further forward to read the terrain. A road cyclist requires a low centre of gravity, thus placing the neck under significant load to maintain this pose for a period of time.
This last point is a common presentation of clients attending Sport and Spinal Physiotherapy. Overloading the trapezius muscles (that run along the side of the neck and shoulder, which attach to the base of the head) can lead to excess tension that can restrict blood flow to the area. This can result in painful trigger points and muscle spasms.
Tour de France legend Chris Froome has a very unique style of riding in terms of his head and neck position. He adopts a “head-dip” ride position as
“My neck gets tired. I’ve a very rounded upper back and I find my neck gets tired. I find it’s easier for me to breathe, I can get more oxygen when my head is lower down.”

Stretch and strengthen your head and neck
Two ways to improve your head and neck position on the bike include:
Stretch – Pull Downs

Sit in a chair with your feet flat on floor and your back straight. Pull your chin to your chest and then slightly tilt your head slightly away from the side you want to stretch.
Strengthen – Seated Puppet
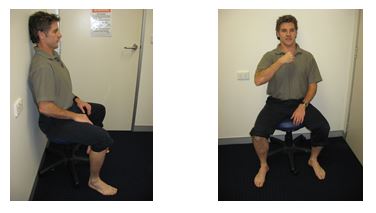
Sit on a chair/car seat with your back flat against the wall/headrest and your head facing forwards with your chin slightly tucked in. Imagine there is a string through your chest and a steel rod through your neck. Imagine the string is being pulled forwards and slightly upwards until your shoulder blades just leave the wall.
2. Bike position for your shoulders

A common phrase heard in the clinic is “My shoulders are fine all day long until I get off my bicycle”. There are a number of reasons as to why this may occur. The shoulder muscles reduce the loads on the lower back and the pressure on the hands.
One of the primary stabilizing muscles of the shoulder whilst riding is the serratus anterior. If this muscle is tight or fatigues easily then your entire bike setup will be disjointed. For road cyclists, optimal position for shoulders should enable you to hover your hands over the hoods (the middle portion of the hand-helds or rather past the top bar but before the drop bar).

Stretch and strengthen your shoulders
Two ways to improve your shoulder position on the bike include:
Stretch – Waterski
Stand with your feet shoulder width apart. Bend your knees, lean forwards and grasp pole/door handle with your hand. Push your body backwards. Push your upper trunk towards the side of the arm you are stretching without moving your hips sideways.
Strengthen – Seated row
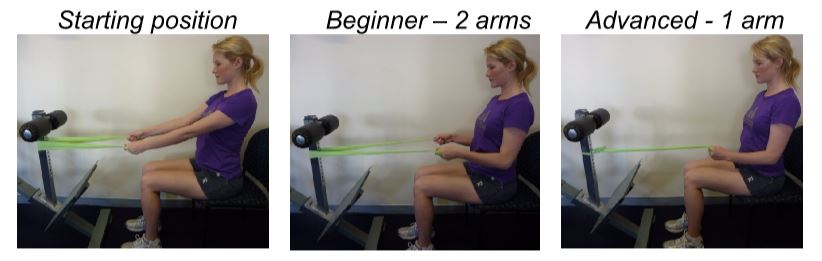
Loop an exercise band around a pole and sit upright with your arms straight, approximately one metre back on a chair. Draw your shoulder blades back and down and hold this position whilst doing the exercise. Hold the band with both hands (or one hand for more advanced) and pull both elbows back at the same time.
3. Bike position for your arms and wrists
Arm pump on your mountain bike is something you would only wish on your boss (if it is that kind of “boss”). Arm pump is tensing the underarm muscles over a sustained period of time whilst holding the handlebars too tightly. This results in reduced blood flow which causes the loss of power in the hand muscles. Whilst it is difficult to relax as you descend down some of the drop-offs out at Mt. Stromlo, the ability to relax your forearms and wrists as you cycle takes time to master.

For road bikers, hands are especially “load sensitive”.Essentially, the hands can only tolerate roughly 20% of the load acting on the body. Compression of the ulnar nerve (symptoms involve tingling in the little and ring ringer) is a common injury for cyclists who spend a great portion of their day cycling. Be mindful of not locking out your wrists as well, as this can also apply undue stress on the medial nerve. Therefore, it is extremely important to continually move your wrists around whilst cycling.
Stretch and strengthen your wrists
Two ways to improve your arm and wrist on the bike include:
Stretch – Wrist flexor + extensor
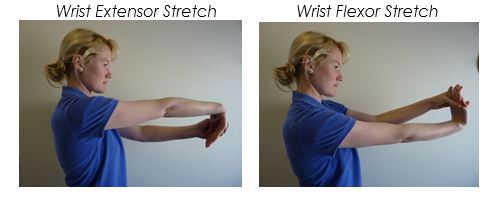
Stand with your shoulder up at 90° and your elbow straight. Using your other hand, place it over the fingers and bend the wrist forwards or bend the wrist backwards until you feel a stretch.
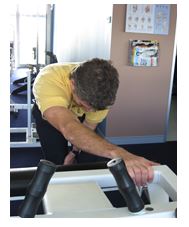
Strengthen – Dynamic wrist extensor
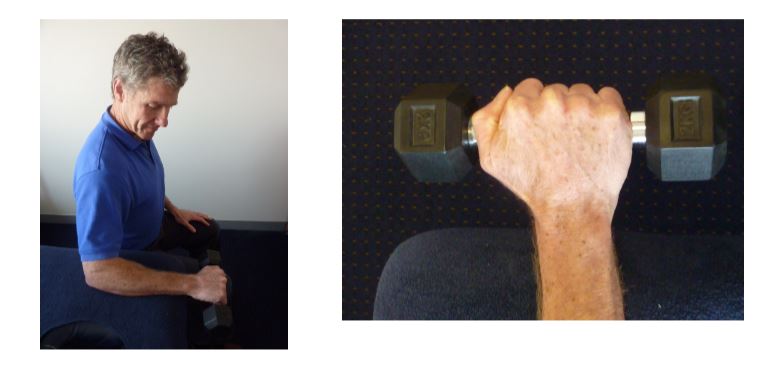
Sit on a chair with your forearm lying on a table, your elbow bent at 90° and your wrist hanging off the front of the table. Make sure that your thumb is on top. Slowly lift the weight by bending your wrist upwards to 90% range, and then slowly lower it down to 90% range.
4. Bike position for your thoracic spine and torso
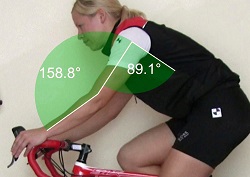
Posture is critical in your bike set-up. You can change your posture by choosing the right handlebar orientation, adjusting your handlebar stem and shape of your handlebars. It is a very individualised set-up on your bike to gain optimal comfort in your riding position. Your type of riding will also dictate your thoracic spine and torso position.
For myself personally, I prefer quite a steep upper arm-to-torso angle on my road bike (roughly 100 degrees). This enhances the aerodynamics as well as work into my posture of rounded shoulders and stiff upper thoracic spine. The subsequent angle on my mountain bike is reduced. This is because I need freedom to move around the bike (roughly 80 degrees). When I commute to work, I am more relaxed on the bike and scanning for traffic. Therefore, an arm-to-torso angle of approximately 60 degrees.
Stretch and strengthen your back
2 ways to improve your thoracic spine on the bike include:
Stretch – Thoracic extension

Lie down over the top of a 90mm PVC pipe with your knees bent up. If too painful try a smaller PVC pipe. Cross your arms over your chest and push through your feet so that you slowly roll up and down over the pipe.
Strengthen – Breaststroke preparation
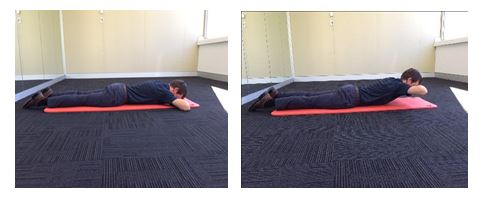
Lay flat on your stomach with your legs long. Bend your elbows and place your hands at the level of your forehead with palms facing downwards towards the mat. Tilt your hips forwards into the mat. Focus on lengthening through your upper back and neck whilst you slowly lift your head 10-15cm off the mat. Hold yourself in this position for 5-10 seconds before slowly lowering yourself down.
Conclusion
We’re running a series of free programs in October by our bike guru Simon Davis:
• October 11: Bike fitness
• October 25: Bike fitting
As well as an nutrition for cyclists workshop by our leading Dietician Holly Smith:
• October 18: Nutrition
Incorporating all of these elements into your cycling is a great way to get started for Spring. You’ll also help keep those nagging injuries at bay. If your bike position or particular injuries keeps flaring up whilst cycling, then make an appointment to see your physiotherapist.
Happy riding!

References:
1. http://www.hr.ubc.ca/ergonomics/files/Bike-Ergonomics-reduced-size.pdf
2. www.bikedynamics.co.uk/neckpain.htm
3. http://www.cyclingweekly.com/news/racing/tour-de-france/chris-froome-explains-his-head-down-riding-style-184455
4. http://enduro-mtb.com/en/how-to-get-rid-of-arm-pump/
5. http://www.icebike.org/wp-content/uploads/2015/06/hybrid-bicycle-26798131.jpg